


什么是 SpringCloud Stream
SpringCloud Stream是一个用于构建与共享消息系统连接的高度可伸缩的事件驱动微服务框架。
该框架提供了一个灵活的编程模型,该模型基于已经建立的和熟悉的Spring习惯用法和最佳实践,包括对持久发布/订阅语义、消费群体和有状态分区的支持。
Spring Cloud Stream is a framework for building highly scalable event-driven microservices connected with shared messaging systems.
The framework provides a flexible programming model built on already established and familiar Spring idioms and best practices, including support for persistent pub/sub semantics, consumer groups, and stateful partitions.
总之一句话:SpringCloud Stream是一款负责屏蔽底层消息中间件的差异,降低切换成本,统一消息的编程模型。
SpringCloud 官网:https://spring.io/projects/spring-cloud
SpringCloud Stream 参考文档:https://docs.spring.io/spring-cloud-stream/docs/3.1.6/reference/html/
SpringCloud Stream 设计思想
当我们的项目中存在多重消息队列的时候,我们无需关注底层的实现逻辑。通过SpringCloud Stream无缝切换,适配我们代码。有点类似于Hibernate的HQL语言,无需关注底层的数据库类型,会自动等装成适合对应数据的语言。
注意:SpringCloud Stream 当前版本仅仅支持RabbitMQ和Kafka。
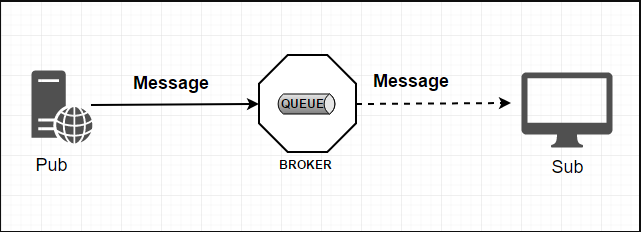
说起标准的消息队列,无非就是下面这幅图:
 。
。
- 生产者/消费者之间靠消息媒介传递信息内容 —— Message。
- 消息必须走特定的通道 —— 消息通道MessageChannel。
- 消息通道里的消息如何被消费呢,谁负责收发处理 —— 消息通道MessageChannel的子接口SubscribableChannel,由MessageHandler消息处理器所订阅。
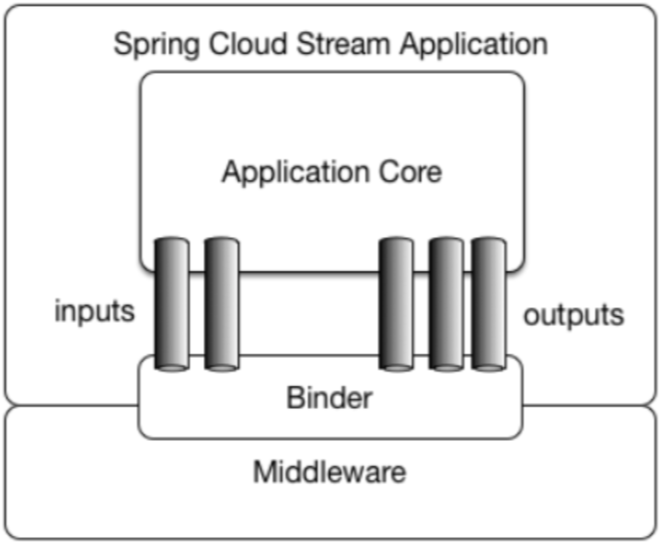
SpringCloud Stream 正是通过定义绑定器作为中间层,完美地实现了应用程序与消息中间件细节之间的隔离。通过向应用程序暴露统一的Channel通道,使得应用程序不需要再考虑各种不同的消息中间件实现。
通过定义绑定器Binder作为中间层,实现了应用程序与消息中间件细节之间的隔离。

Binder: 很方便的连接中间件,屏蔽差异。- INPUT对应于消费者
- OUTPUT对应于生产者
Channel: 通道,是队列Queue的一种抽象,在消息通讯系统中就是实现存储和转发的媒介,通过Channel对队列进行配置。Source和Sink: 简单的可理解为参照对象是Spring Cloud Stream自身,从Stream发布消息就是输出,接受消息就是输入。
PS:Stream中的消息通信方式遵循了发布-订阅模式。在RabbitMQ就是Exchange;在Kafka中就是Topic。
编码API和常用注解
前面说到,SpringCloud Stream通过定义绑定器Binder作为中间层,实现了应用程序与消息中间件细节之间的隔离。而output对应生产者,负责投递消息到channel;input对应消费端,负责接受消费消息。
| 组成 | 说明 |
|---|---|
| Middleware | 中间件,目前仅支持RabbitMQ和Kafka。 |
| Binder | Binder是应用与消息中间件之间的封装,目前实行了Kafka和RabbitMQ的Binder,通过Binder可以很方便的连接中间件,可以动态的改变消息类型(对应于Kafka的topic,RabbitMQ的exchange),这些都可以通过配置文件来实现。 |
| @Input | 注解标识输入通道,通过该输入通道接收到的消息进入应用程序 |
| @Output | 注解标识输出通道,发布的消息将通过该通道离开应用程序 |
| @StreamListener | 监听队列,用于消费者的队列的消息接收 |
| @EnableBinding | 指信道channeI和exchange绑定在一起 |
SpringCloud Stream初体验
基于原生绑定关系的发送和接受
首先我们先确定的依赖环境:
- SpringBoot 版本:2.3.12.RELEASE
- SpringCloud 版本:Hoxton.SR12
- SpringCloud Alibaba 版本:2.2.7.RELEASE(可以不用导入,但是做springcloud项目习惯导入)
- RabbitMQ正确安装
- 导入SpringCloud Stream的依赖坐标。两个坐标二选一。
<dependency>
  <groupId>org.springframework.cloud</groupId>
  <artifactId>spring-cloud-stream-binder-rabbit</artifactId>
</dependency>

<!--或者是下面这个坐标-->
<dependency>
  <groupId>org.springframework.cloud</groupId>
  <artifactId>spring-cloud-starter-stream-rabbit</artifactId>
</dependency>
1. 创建一个producer作为生产者,生产消息。
# 端口
server:
  port: 8001
# 项目名称
spring:
  application:
    name: stream-rabbitmq-consumer
  # rabbitmq的相关信息
  rabbitmq:
    host: IP
    port: port
    username: username
    password: password
    # rabbitmq虚拟机名称,默认为 /
    virtual-host: virtual-host
  # springcloud stream 相关的配置
  cloud:
    stream:
      # 绑定生产者
      bindings:
        output:
	  # 交换机的名称:springcloud.stream.firstDemo
          destination: springcloud.stream.firstDemo

# 注册中心的相关配置,你也可以使用nacos
eureka:
  client:
    register-with-eureka: true
    fetch-registry: false
    serviceUrl:
      defaultZone: http://localhost:7000/eureka
我们可以看到,原本rabbitMQ相关的配置没有变动,多了一些SpringCloud Stream相关的配置,因为这个项目为生产者,bindings后面跟随的是output。
2.创建生产者
/**
 * @author bearjun
 * @date 2022/4/7 14:37
 * @desc
 */
@EnableBinding(Source.class)
public class MessageSendService {

    @Autowired
    MessageChannel output;

    public void sendMessage(String message) {
        output.send(MessageBuilder.withPayload(message).build());
    }
}
这里可以看到,Binding是Source.class,这是SpringCloud Stream提供的默认的输出通道。可以看一下源码:
/**
 * Bindable interface with one output channel.
 *
 * @author Dave Syer
 * @author Marius Bogoevici
 * @see org.springframework.cloud.stream.annotation.EnableBinding
 */
public interface Source {

	/**
	 * Name of the output channel.
	 */
	String OUTPUT = "output";

	/**
	 * @return output channel
	 */
	@Output(Source.OUTPUT)
	MessageChannel output();

}
可以看到,这就是一个接口。然后我们发送消息,就是调用的MessageChannel output()的send进行的消息发送。
那为什么用的是MessageBuilder.withPayload(message).build()来构建消息呢?
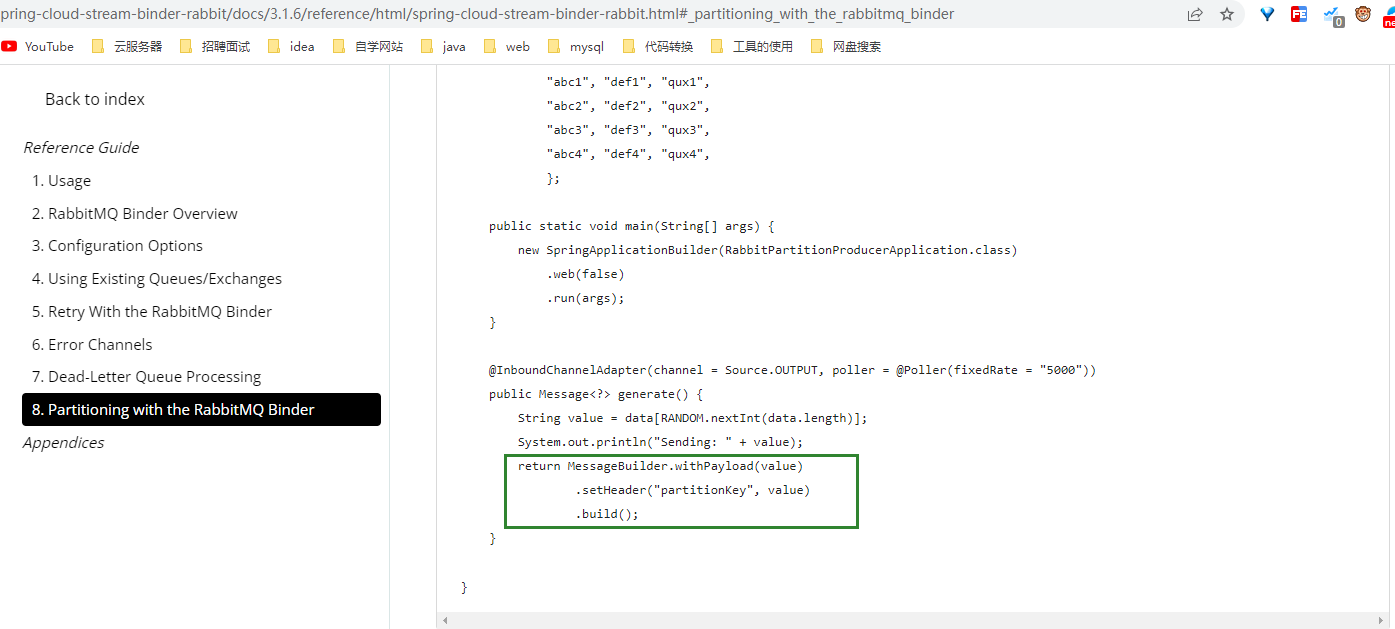
因为官方文档就是这样构建的。另外MessageBuilder还可以设置头信息。
3. 创建一个消费者consumer,用于消费消息。
server:
  port: 8002
spring:
  application:
    name: stream-rabbitmq-consumer
  # rabbitmq的相关信息
  rabbitmq:
    host: IP
    port: port
    username: username
    password: password
    # rabbitmq虚拟机名称,默认为 /
    virtual-host: virtual-host
  # springcloud stream 相关的配置
  cloud:
    stream:
      # 绑定消费者
      bindings:
        input:
	  # 交换机的名称:springcloud.stream.firstDemo
	  # 注意和生产者保持一致
          destination: springcloud.stream.firstDemo

# 注册中心的相关配置,你也可以使用nacos
eureka:
  client:
    register-with-eureka: true
    fetch-registry: false
    serviceUrl:
      defaultZone: http://localhost:7000/eureka
这个配置和生产者的配置如初的一致,就是这边bindings的是input,因为这边是消费者。
4. 创建消费者消费消息
/**
 * @author bearjun
 * @date 2022/4/8 16:24
 * @desc
 */
@EnableBinding(Sink.class)
public class MessageService {

    @StreamListener(Sink.INPUT)
    public void printMessage(Message<String> message) {
        System.out.println("consumer接到的消息:" + message.getPayload());
    }
}
Sink.class也是默认的绑定监听输入的通道。可以看一下源码:
/**
 * Bindable interface with one input channel.
 *
 * @author Dave Syer
 * @author Marius Bogoevici
 * @see org.springframework.cloud.stream.annotation.EnableBinding
 */
public interface Sink {

	/**
	 * Input channel name.
	 */
	String INPUT = "input";

	/**
	 * @return input channel.
	 */
	@Input(Sink.INPUT)
	SubscribableChannel input();

}
这里需要注意的是,这个接受参数的Message<String> message中的String是根据生产者生产的消息类型而定的。
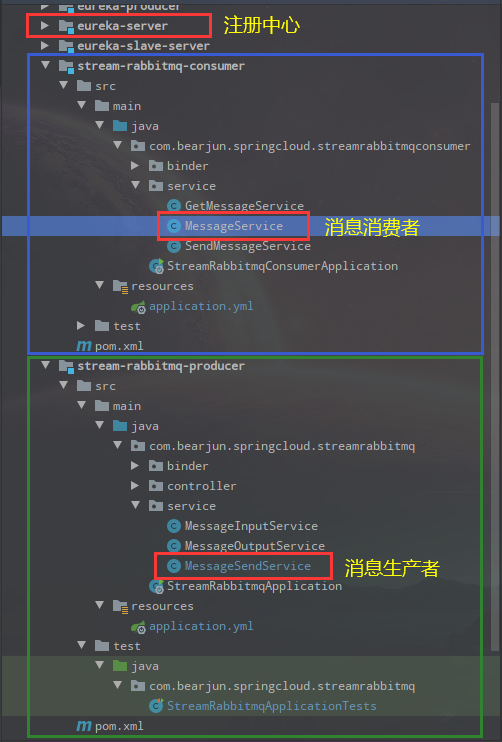
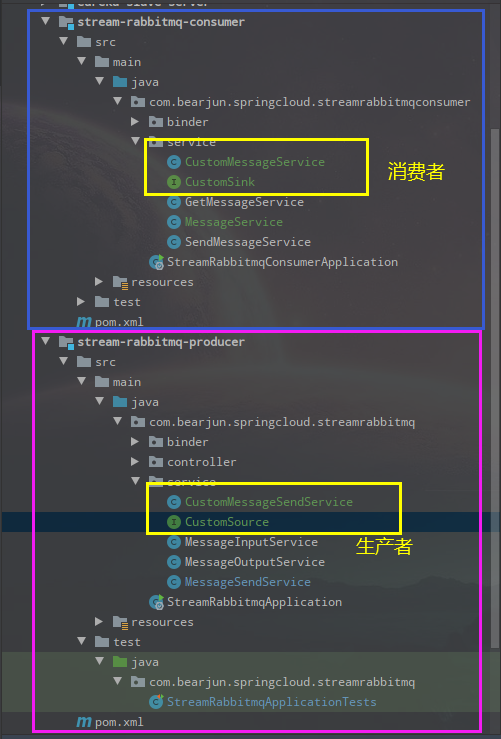
最终的目录结构如下:
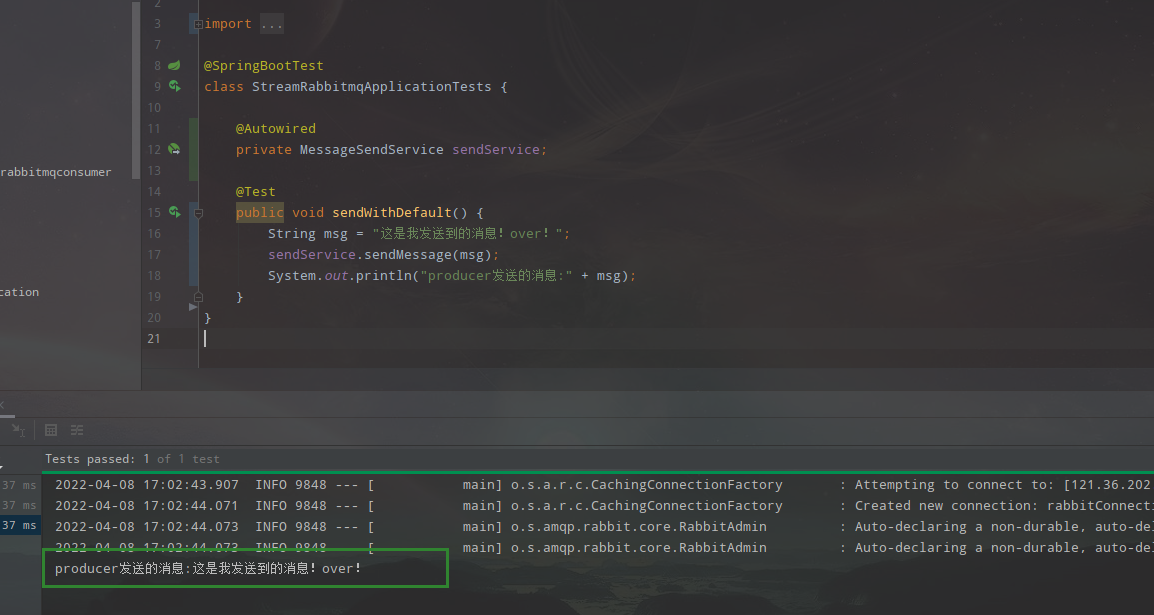
5. 编写测试用例测试。
@SpringBootTest
class StreamRabbitmqApplicationTests {

    @Autowired
    private MessageSendService sendService;

    @Test
    public void sendWithDefault() {
        String msg = "这是我发送到的消息!over!";
        sendService.sendMessage(msg);
        System.out.println("producer发送的消息:" + msg);
    }
}
最后我们运行测试用例,可以看到:

自定义绑定关系的发送和接受
刚才我们也看了,默认的绑定基于Source.class和Sink.class。如果我们自定义的话,就是定义自己的Source.class和Sink.class。
这个在原有的基础上,基本不需要变动,只需要添加如下的方法或者接口即可。
生产者相关的代码
/**
 * @author bearjun
 * @date 2022/4/8 17:20
 * @desc
 */
public interface CustomSource {
    /**
     * 交换机的名称
     */
    String EXCHANGE_NAME = "springcloud.stream.custom";

    /**
     * @return output channel
     */
    @Output(CustomSource.EXCHANGE_NAME)
    MessageChannel custom();
}
/**
 * @author bearjun
 * @date 2022/4/8 17:24
 * @desc
 */
@EnableBinding(CustomSource.class)
public class CustomMessageSendService {

    @Autowired
    CustomSource customSource;

    public void sendMessage(String message) {
        customSource.custom().send(MessageBuilder.withPayload(message).build());
    }
}
消费者相关的代码
/**
 * @author bearjun
 * @date 2022/4/8 17:26
 * @desc
 */
public interface CustomSink {
    /**
     * 自定义交换机名称,和生产者保持一致
     */
    String EXCHANGE_NAME = "springcloud.stream.custom";

    /**
     * @return input channel.
     */
    @Input(CustomSink.EXCHANGE_NAME)
    SubscribableChannel customInput();
}
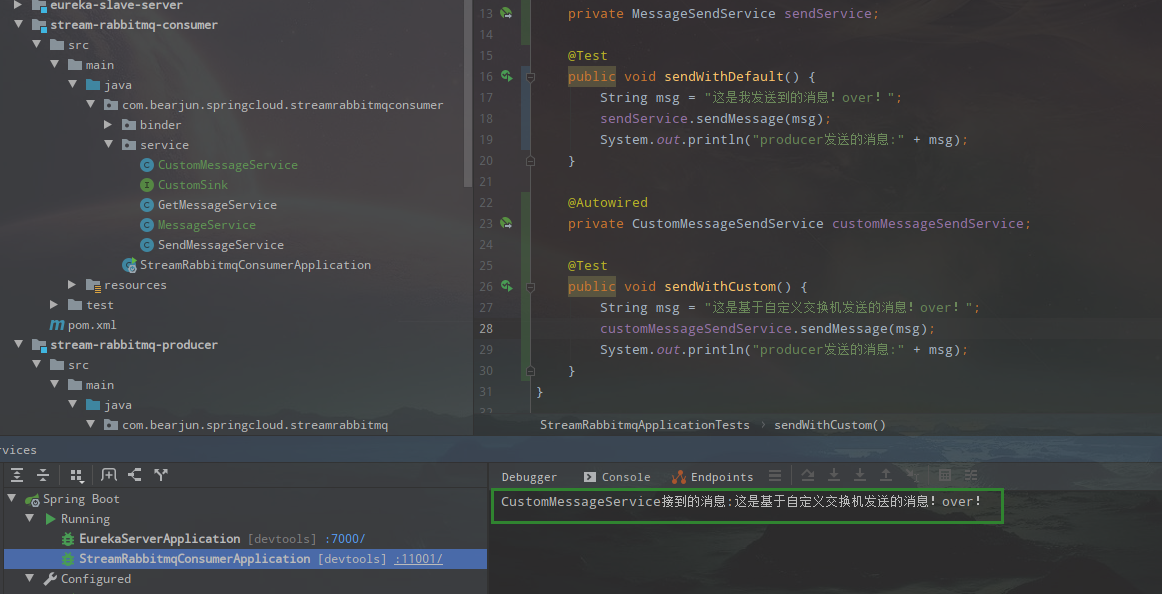
/**
 * @author bearjun
 * @date 2022/4/8 17:29
 * @desc
 */
@EnableBinding(CustomSink.class)
public class CustomMessageService {

    @StreamListener(CustomSink.EXCHANGE_NAME)
    public void printMessage(Message<String> message) {
        System.out.println("CustomMessageService接到的消息:" + message.getPayload());
    }
}
编写测试类测试
@SpringBootTest
class StreamRabbitmqApplicationTests {
    @Autowired
    private CustomMessageSendService customMessageSendService;

    @Test
    public void sendWithCustom() {
        String msg = "这是基于自定义交换机发送的消息!over!";
        customMessageSendService.sendMessage(msg);
        System.out.println("producer发送的消息:" + msg);
    }
}
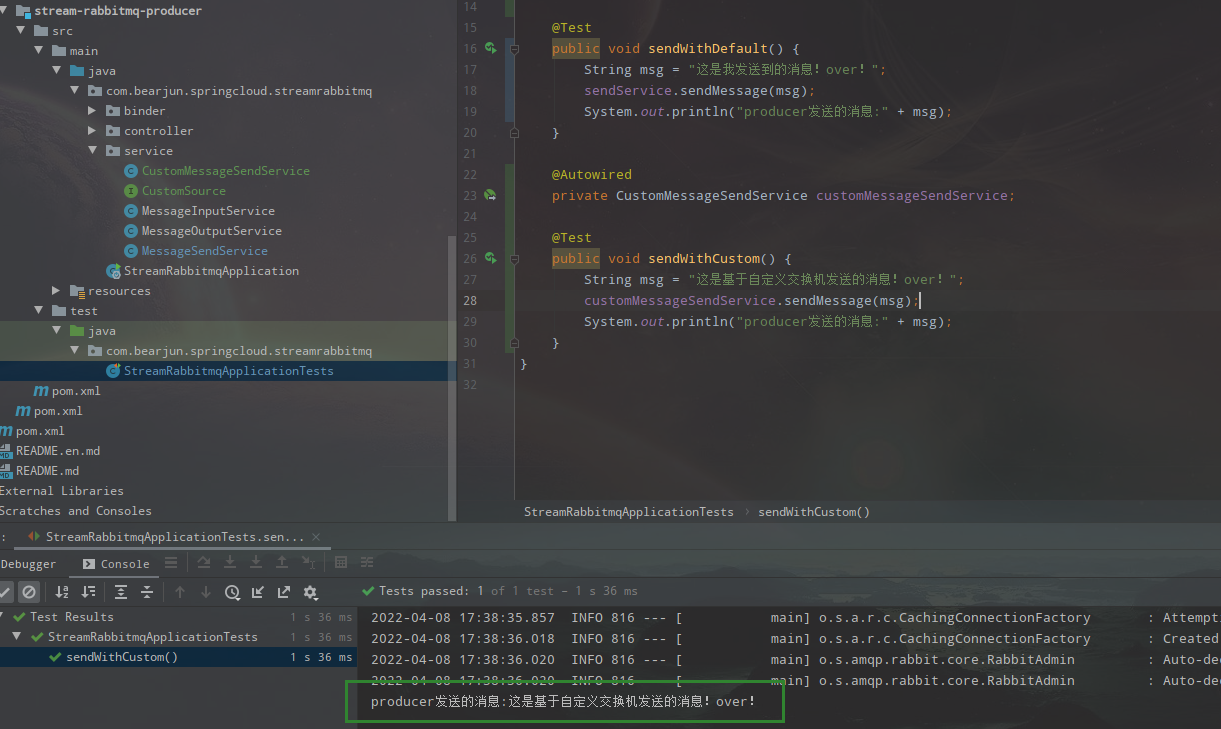
怎么样,通过上面的案例是不是觉得SpringCloud Stream的上手还是比较简单的。
评论区